Steak Penne pasta with homemade tomato sauce

As I’ve been developing my cooking skills i have been wanting to try new techniques for prep and presesentation. For this dish i will be making full use of fresh tomatoes from start to finish. This is a fun twist to a simple penne pasta.

For this dish you will need the following:

3 petite sirloin steaks

4 large red tomatoes

1 box penne pasta (Alternatively you can use protein penne if available for extra protein)

Assorted seasonings of choice ( for this i used garlic powder, black pepper, basil, mrs dash salt free table blend, steak seasoning, italian seasoning and onion powder)

2 cups heavy whippng cream

1/4 stick of butter

First we will want to place our pot onto the stove with water and cut the bottoms of our tomatoes in an x shape and place into the water. Boil these for 60 seconds. This wi blanche the tomatoes making them easy to work with. Once blanched pour over cool water to stop the internal cooking and drain. Once drained, peel the tomatoes and retain the skins for later. Once peeled place into a blender and blend into a tomato juice.

Next we will place our pasta into water and cook until al dente and drain. While we are waiting for the pasta to cook, we can work on prepping our steak for cooking with our seasonings.  Once the pasta is done we can get to work on our steak. Cook and butter baste to your desired level of pink (or lack thereof if well done). For cooking the steak i utilized a family size forman grill to drain extra fat and once the steaks are done we can put our tomatoe skils in to char a little for presentation.

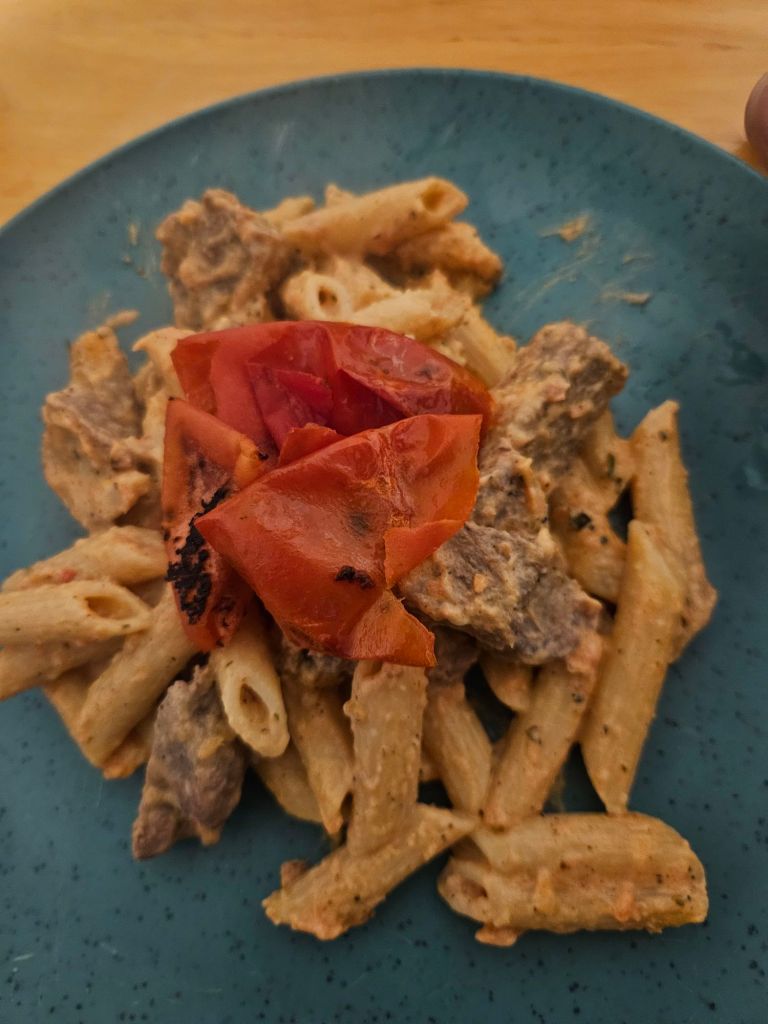
Once the steak is cooked,  cut it into small bite sized pieces and mix into the pasta. Afterward, heat your heavy whipping cream and add your tomato puree and stir in garlic and onion powder, itallialn seasoning, basil and pepper to add more flavor. Stir until color changes and to desired taste. Pour the sauce into the pasta and heat on a low simmer stirring the pot to blend it all together. Place onto a place and add some of the charred tomato skins and serve!

And there you have it, a simple flavorful dish using all of a tomato. This was a very good dish that has a lot of versatility to it in terms of how to make the sauce and pasta options. Until the next time dear readers. Excelsior!

Working on my presentation more

Picadillo (Giniling) – Ground Beef in Tomato Sauce


I enjoy trying different kinds of foods from all over when I travel, and I try to also find recipes for places I might want to go as well. I make it a point to explore different kinds of cuisine from all places. One dish that i recently stumbled upon is Picadillo.  Picadillo, known in the Philippines as Giniling, is a hearty, comforting dish that brings together simple ingredients in a rich tomato-based sauce. What makes Giniling special is how adaptable it is. You can swap ground beef for pork, chicken, or even turkey. You can also swap the veggies for assorted heartiness and color.

For this recipe, you will need the following:

1 lb  ground beef (the leaner, the better, but I found a little fat in this recipe worked well)

3 medium potatoes, diced

2  large carrots, diced

1 medium onion, chopped

3 cloves garlic, minced

1 can tomato sauce (Alternatively I used fresh tomatoes that were blanched and chopped in the food processor)

2 tbsp soy sauce (I found teriyaki sauce works in a pinch)

2 tbsp cooking oil

Assorted spices of your choice to taste


Now let’s get down to the good part:

1. Prepare the base: Heat oil in a large pan over medium heat. Sauté onion and garlic until fragrant and translucent.


2. Brown the meat: Add ground beef and cook until browned, breaking up clumps with a spatula. Drain excess fat if necessary.


3. Season: Stir in soy sauce, tomato sauce, (for additional texture you can opt for  tomato paste to mix with the sauce). Simmer for 2–3 minutes.


4. Add vegetables: Mix in potatoes and carrots. Cover and cook for about 10 minutes, stirring occasionally, until vegetables are tender.


5. Finish: Add any additional veggies you may want to use (commonly peas and peppers are used, but you can use what you want) and the seasonings. Simmer for another 5 minutes until everything is well combined. (Green onions garnish is optional)

The finished product

And there you have it. A simple hearty dish that the whole family can enjoy. This one was a lot of fun. Until the next time, dear readers. Excelsior!

Guilt Free Protein Muffins

When it comes to desserts, nothing is more satisfying than a good old-fashioned muffin. They are easy, quick, and tasty, but with the amount of sugar that can come in most muffins, it prompted me to see how i can make them less sugary and equally tasty.

For this recipe you will need the following: 3/4 sugar free sweetener,1 1/2 cup flour (or almond flour), 2 teaspoons of vanilla extract, 2 large eggs, 2 teaspoons baking powder, 2/3 cup almond milk, 2/3 cup olive oil, 1 cup of frozen fruit of your choice, 1/2 teaspoon sea salt, 3 cups of protein powder of your choice (i used the aldi brand which has 30 g of protein per scoop), and lastly avocado oil spray to lubricate the muffin tray with optional muffin cups.

While preheating the oven to 400 degrees Fahrenheit, take your dry ingredients and whisk together in a bowl and set aside. Next, combine all dry ingredients and pour over top of the dry ingredients and fold in the fruit as you stir into a batter. Once all the ingredients are together pour evenly into the muffin tray (my muffin tray made about 6 large muffins so can be spread out over at least 12 smaller muffins if you have a higher capacity tray). Once all the batter is in the tray, place the muffins into the oven for 20-25 minutes or until you can put in a toothpick and remove it from the muffin cleanly.

I left in in a little longer than anticipated, but it was still amazing.

These muffins were so delicious, and I didn’t feel guilty eating a single one. With the sugar free sweetener and protein powder this made it into a nice staple for a post workout treat with 15 grams of protein per serving (for large muffin tray at 30 grams of protein per scoop with the protein i used. Your protein might vary depending on the powder used). These can last up to about a week and, of course, can be frozen for later. Until the next time, dear readers excelsior!

Shepherds pie

5 simplest recipes are the best. This time, I tried my hand at a dish I tried a while back that absolutely blew my mind. I also added my own twist on this recipe to make it even more macro friendly with some liberties I took with a few substitutions and additions as I went along.

For this recipe variant I used the following: 3 large peeled and quartered potatoes, 1 stick of butter (salted /unsalted), 1 medium onion chopped, 1 to 2 cups mixed vegetables, 1/2 cup broccoli chopped, 1 1/2 pounds ground beef (i utilized 93% lean 7% fat in this instance), 1 teaspoon of Worcester sauce (Alternatively A1 steak sauce works surprisingly well as a substitute), 1/2 cup of beef broth (alternately i used beef bone broth) , and any seasonings of your choice.

First peel the potatoes and place them into a pot to boil until fork tender for about 20 minutes

While the potatoes cook sautee all the vegetables together until tender in a skillet over medium heat.

For the next step, cook the ground beef and proceed to drain any fat and add to the vegetables and simmer with the seasonings, broth, and worcester sauce for 10 minutes covered up.

Once the potatoes are done, cut up the potatoes and add the butter and sprinkle with garlic powder (optional) and mash until it is all the way mashed up.

After mashing the potatoes, put the meat into an oven safe container and spread the potatoes over the tip and spread it out, and score with a fork if desired.

After scoring the potatoes place in a preheated oven at 400 degrees for 30 minutes until browned.

Once out of the oven feel free ro garnish with an optional green onion garnish and serve and enjoy.

This dish was so good I made it twice in the same two weeks. It makes for an excellent prepped meal through the week and a great comfort meal. The addition of bone broth and the broccoli in this version adds some extra macros to the mix. Until the next time dear readers, excelsior!

3 ingredient low calorie  bread

I’ve been bitten by the cooking from scratch bug in recent weeks. There have seen many recipes i have had a want to create over the years and have tried recipes from various regions of the country and a few overseas.  I have decided to take on a challenge in the kitchen of which I’ve never undertaken: making bread. This was a beginner friendly bread that I created using a few simple ingredients: bread flour, rapid rise yeast, and pink hymilayan sea salt.

To start, you will want to heat 1 and a half cups of water on the stove. Next, you will need 3 and a half cups of bread flower to go into a large bowl. Once this has been placed in the bowl, you will need to add a table spoon of rapid rise yeast and half of a tablespoon of pink Himalayan sea salt

Dry ingredients ready to rock and roll

Once the dry ingredients are done the water should be nice and hot. Pour the water into the bowl and mix around until the flour is fully incorporated into the mix and form it into a ball.

I’m having a great time.  A ball if you will

Once this is shaped into a ball, cover it and place it somewhere warm and let it sit for an hour to build up in size. Once that is done put it into a bread pan that has been sprayed with cooking spray and form it into the pan and let it sit for another hour.

Two hours later

Once the hour has passed, put your oven on 450. Once the oven is heated bake the bread for 20 minutes to completion and remove to cool.

Bonus tip: I forgot that scoring the bread helps the bread expand more.

Once the bread has cooled, you will have a nice loaf of low calorie bread. I let a piece of this sit, but this bread lasted me about 5 days before it started to turn. I would recommend eating this right away while it is fresh.

Even without scoring the first time the bread looked great.

This was a wonderful first take on making a new dish. I realized this was rather small but I am looking to make it into larger loafs for the next time. This makes a very good peanut butter sandwich and with no preservatives, it was the most  guilt free pb&j that I have had in a while. Until the next time, dear readers, excelsior!