Simple Mason Jar Protein Ice Cream

Sometimes, you just want ice cream without the guilt or the sugar crash. That’s where this vanilla protein ice cream comes in. It’s creamy, sweet, and tastes like a real treat, but it’s made with simple ingredients you probably already have on hand. Plus, it’s packed with protein, so it can double as a post-workout snack or late-night dessert that won’t derail your fitness goals. This ice cream is also very easy to make in 30 minutes. All that will be needed to make this is a simple mason jar.

For a simple single-serving batch you will need the following:

1 scoop vanilla protein powder

1 cup heavy whippng cream

½ teaspoon vanilla extract

1–2 tablespoons sugar substitute (like stevia adjust to taste)

1 pinch of pink Himalayan salt (balances flavor)

Let’s get to the fun part

1. Combine all ingredients into an 8 ox mason jar

2. Close and shake the jar for up to 5 minutes to mix (try not to over mix)

3. Freeze for 30 minutes (don’t freeze it too long as it could damage the jar)

4. Renove from the freezer and serve with your favorite toppings or straight from the container.

I ate the whole thing. Zero regrets

The best part about this treat is that you can customize your toppings (or protein powder if you want something like chocolate or strawberry). This is a beginner friendly recipe that can be enjoyed the same day. Until the next time dear readers. Excelsior!

3 ingredient low calorie  bread

I’ve been bitten by the cooking from scratch bug in recent weeks. There have seen many recipes i have had a want to create over the years and have tried recipes from various regions of the country and a few overseas.  I have decided to take on a challenge in the kitchen of which I’ve never undertaken: making bread. This was a beginner friendly bread that I created using a few simple ingredients: bread flour, rapid rise yeast, and pink hymilayan sea salt.

To start, you will want to heat 1 and a half cups of water on the stove. Next, you will need 3 and a half cups of bread flower to go into a large bowl. Once this has been placed in the bowl, you will need to add a table spoon of rapid rise yeast and half of a tablespoon of pink Himalayan sea salt

Dry ingredients ready to rock and roll

Once the dry ingredients are done the water should be nice and hot. Pour the water into the bowl and mix around until the flour is fully incorporated into the mix and form it into a ball.

I’m having a great time.  A ball if you will

Once this is shaped into a ball, cover it and place it somewhere warm and let it sit for an hour to build up in size. Once that is done put it into a bread pan that has been sprayed with cooking spray and form it into the pan and let it sit for another hour.

Two hours later

Once the hour has passed, put your oven on 450. Once the oven is heated bake the bread for 20 minutes to completion and remove to cool.

Bonus tip: I forgot that scoring the bread helps the bread expand more.

Once the bread has cooled, you will have a nice loaf of low calorie bread. I let a piece of this sit, but this bread lasted me about 5 days before it started to turn. I would recommend eating this right away while it is fresh.

Even without scoring the first time the bread looked great.

This was a wonderful first take on making a new dish. I realized this was rather small but I am looking to make it into larger loafs for the next time. This makes a very good peanut butter sandwich and with no preservatives, it was the most  guilt free pb&j that I have had in a while. Until the next time, dear readers, excelsior!

Benefits of juicing

Recently, I went to a juicery for the first time. I enjoyed the diverse mixes of fruit and veggies and felt the need to get another mixed juice. I then took a look at the price of the juice and asked myself: What if I just did this at home to save myself some money? Fast forward a week, and I purchased this lovely little tool.

And so it begins

Before I begin, there are many reasons why juicing was an appealing method to amd why a juicer was a wonderful investment. The first part is that without extra sugars and preservatives, it is lower in calories, and I can enjoy it guilt free compared to regular store bought fruit juice. Keeping in mind this juice typically should be consumed in 24-48 hours due to the lack of said preservatives. Additionally, this helps more of the nutrients from the fruits and vegetables get into your system more easily than the body needs. During the summer months, this is a refreshing way to keep hydrated . Also, there are good natural additives one can use, such as cinnamon and tumeric, for aid in weight loss and better digestion. And lastly, it’s just fun coming up with different flavors and mixes.

I then began reading up on different juicing combinations and ideas and decided to give it a give it a try. My first juice was an apple, pineapple, and strawberry juice mixed with a little bit of cinnamon for the extra kick.

The Tiki glass really set the tone for me

I then got to brainstorming and looking for inspiration for the next juice. That’s when things got a little…..wild. Early on a Sunday morning, I felt the creative urge to whip something up, and I had the great idea to make another juice. But this time, there was a twist. The first juice was a pineapple, cherry, strawberry juice with cinnamon.

This was insanely sweet

Next, I decided to try vegetables, so I made a green juice with green apple, spinach, cucumber, lemon, and tumeric.

Added a little too much lemon but excellent nonetheless

Once I finished juicing , I realized I had pulp left over. Then my wheels began to turning and I went to the net for different ideas on how to use the pulp. My first creation was adding a little extra frozen fruit to make a smoothie bowl

Can never go wrong with fruit and granola

Once I devoured my smoothie bowl, I wondered what I could do with the veggie pulp. Then, after some digging, I decided to make it into a dip akin to a spinach artichoke dip. A little cottage cheese as a base (and extra protein to boot) and a little cheddar cheese really brought this together.

Before
After

There are many benefits to juicing. This was a wondeful experience for my first few times trying it, and I look forward to trying more combinations in the future. This would be a wonderful tool for anyone’s kitchen and the possibilities for not just juicing but also what can be done with the pulp alone are numerous. Until the next time, dear readers, excelsior!

Easy Peach Cobbler Cinnamon Rolls

It’s been a while since I last shared a dessert recipe. In recent months, I’ve been coming up with various dishes, but a sweet treat is a must with the summer coming up. This is a quick and easy recipe for a tasty dessert combining two of my favorite desserts: peach cobbler and cinnamon rolls.

To make this you will need the following ingredients: 1 package of your favorite 8 count cinnamon rolls, 1 can of peaches ( sliced or whole or fresh to make 15 Oz worth), 1/4 cup heavy cream, 5 tablespoons of butter, 1/2 cup flower, 1/4 cup brown sugar.

First you will need to preheat your oven to 350 degrees F. While the oven is heating measure out 1/4 cup of peach juice and cut up the canned peaches (Alternatively just cut the peaches if they’re fresh) if not already sliced.  Mix this juice with your heavy cream and place the mixture into a greased baking pan.

Secondly, place the cinnamon rolls into the pan with the mixture and top with the sliced peaches. Once this is done, place the butter, brown sugar, and flower into a bowl and mix until combined and crumbly. Once the topping is ready, place atop the rolls evenly.

Thirdly, once assembled, place the cinnamon rolls into the oven for 45 minutes. Once out of the oven, pour the icing that came with the cinnamon rolls and enjoy!

A little messy but not bad for a first time

And there you have it in about an hours time you have tasty cinnamon rolls you can enjoy any time. This was a fun and simple recipe to make, and I highly recommend it if you’re a fan of unique cinnamon rolls. Or just love a good sweet treat once in a while! This recipe makes eight tasty cinnamon rolls perfect for sharing… or not. I hope this summer starts for you well, dear readers. Until the next time, excelsior!

Adding a little spice

This month I want to take a brief detour into another personal development skill: cooking. I enjoy it thoroughly and i find it therapeutic to be able to create new dishes in the kitchen. My latest culinary adventure has led me to a nutritious and flavorful low calorie meal: creole shrimp.

For this recipe you will need the following: 1/2 cup of chopped onion, 1/2 cup of chopped green pepper, 4 chopped mushrooms (I had chopped a good two handfuls of pre sliced mushrooms), 1 cup of canned tomatoes, 1/4 teaspoon of oregano, 1/4 teaspoon of salt, 1/8 teaspoon of pepper, 1 pound of shrimp peeled and deveined. Outside of this original combination for the recipe I also added 1 teaspoon of old bay seasoning, 1 teaspoon of Mrs. Dash original blend seasoning, 1/2 teaspoon of paprika. 1/2 teaspoon of red pepper flakes and 1/4 teaspoon of chili powder to spice things up. I also forgot to get bell pepper so I substituted this for asparagus.

To get things started, combine all of the vegetables and spices in a large saucepan. Cook the veggies and spices for 10 minites over medium heat. In the meantime, cook the shrimp over medium heat for the same time with the seasoning blend from above. Once the shrimp has been cooked and the vegetables are nice and tender combine all ingredients in the saucepan and stir. After 5 minites remove the saucepan from the heat and serve!

Soups on!

Cooking is a vital skill all need to keep in their repertoire. This meal is a quick, healthy and nutrient dense meal that is low calorie and it absolutely delicious. Until the next time dear readers, excelsior!

Business Etiquette 102: Professional Eating

In the world of business and in the life and times of the rich and fabulous, there comes a time where one must conduct themselves with refinement and poise. This goes a step past dressing and talking the part of being a professional. Little things such as your posture and eye contact can make or break a deal. The topic I’ll be covering today will be on fine dining etiquette.

  1. Entering the fray  flat,550x550,075,f.u1

Let’s say you get an invite to your boss’ board dinner or maybe you score a lunch meeting with someone you’re looking to get a job with, congrats to you on that opportunity. Now we must set the stage on making sure you’re not eating like you are a caveperson in front of them and making them think you’re gross. The first step is to properly make the introduction, if you read my last post on “impressionable minds” you’ll recall the steps to a proper first impression. The same rule applies here. Do some research on the people you’ll be dining with for good info for conversation. Next make sure when you greet that you keep it on a last name basis unless they give you permission to use their first name (Mr./Ms. Executive). If you forget their name by chance don’t panic, just admit it gracefully and go on with your conversation and if you can’t pronounce their name it never hurts to ask! Also while we are  in the introduction phase and everyone is being seated be sure to not just sit anywhere, try to sit near the host for maximum exposure and also check for reserved seats so you don’t step out of line!


  1. Placement   images (1)

Now that we’re at the table let’s talk about where things go on the table. Take your napkin on your lap immediately after everyone is seated. In the event of you needing to leave the table take your napkin and place it on your chair to indicate you’ll return soon. Upon the end of the meal then place the napkin on the table to indicate you’re finished and ready to go.

Next look at the silverware on your tale. The number of utensils depends on the number of courses being served, you’re going to work from the right side in start furthest from the plate. Properly hold your silverware lie a pencil and don’t wave your silverware around in the air while gesturing, you don’t want to scare people holding your knife like the second coming of Michael Meyers. Once you pick up a silverware piece make sure not to put it down until you’re finished with it and if you drop it leave it and ask for another. You may or may not have glasses for drinking and the same rules apply (usually there are 2-3 glasses, each for water and possibly wines so pay attention to when it’s appropriate to make use of those). To conclude the topic of posture let me remind you that your body posture is just as important as your table placement so do not slouch, keep your elbows off the table and eat at the pace of the table because your posture is important as your performance.


  1. Conversation download

Now we get to the fun stuff, the art of the conversation with your table and your waiter. In regards to your waiter/ waitress please be sure to be courteous and make eye contact with them if you need anything. When ordering be sure not to order the most or least expensive item on the menu, you don’t want to seem cheap or a spendthrift. Ask the host if they’ve eaten at the venue before and see what they recommend but keep two different items in mind and after the host orders order accordingly. Do not order alcohol during the meal, treat this like an interview and have water or a pop (that’s soda for you non Michigan folks reading this). Please be sure to avoid messy foods that might get everywhere i.e. spaghetti or sandwiches, think knife and fork food.

Now let’s talk about your conversation game, you’re not going get far if you can’t talk properly to people. A good conversationalist is above all, polite. Be sure that you’re being an active listener and acknowledge people as they speak to you. Ask good questions, in fact try “echoing” (I say I fly model airplanes and explain a little about how I build them and you ask a question like “so you spend x hours building a plane?”) this method shows that you’re paying attention to the topic at hand. Don’t interrupt people when they’re talking to you, it’s rude and be sure to make eye contact and not let your eyes wander around the room when people address you directly, be in the moment. If someone gives you a compliment gracefully give a thank you and extend compliments genuinely and for the love of all things pure and holy do not broach the topic of politics, sex, religion or anything marked as “things to make a conversation go from civil to civil war real quick”. If things get stale and people are tuning out just change the subject appropriately and don’t open the “business” topics until it’s time to do so.


  1. The food images (2)

Now let’s get ready to dive into the grub hub folks. Chances are at a fancy restaurant or business dinner you are going to have several courses. I know you might be a starvin’ marvin if you get to the table but please wait until everyone is seated and the host starts eating first or encourages you to eat so you’re not being rude. Pro tip: make sure to pass food to the right and pass the salt and pepper together and anything like creamers or syrup pitchers should be given handle first to the recipient. This is still part of the interview!

If you have salad be sure to use the salad fork unless the salad is the main course. If you have something in the salad you don’t like eat around it, DO NOT pick it out. If you need to cut your salad with a knife do it bit by bit. If you have bread at the table tear the bread with your fingers, butter while the bread is on the plate when the butter dish is passed and eat one piece at a time instead of all at once. If you have soup make sure to move the soup spoon away from you toward the center of the back of the bowl. Make sure if crackers are present not to crush them in bag before dumping them into the soup (that works better in chilli anyway), one piece at a time. The soup bowl may be tipped away from you to fill the spoon with the last sips of soup so no using your face and no slurping! Once you’re done place the spoon on the plate underneath the bowl while resting when finished

Time for the main course now. Be sure that you cut your meat and eat one bite at a time instead of all at once. Remove small objects such as pits, fish bones etc. from your mouth quickly with your fingers and place them on the edge of the plate. Don’t use a toothpick at the table, go in private to use it to get things lodged in the teeth. Also make sure to remove sizzle sticks or spoons before taking a drink. Lastly, contrary to our budgets and taste buds, if the portions are too big resist the urge to order the waiter to wrap up your food if you can’t finish it, it’s not appropriate in this context.

5. Conclusion of the meal download (1)

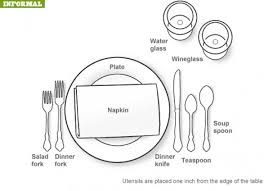
Once you’re done eating place the knife and fork in the “finished “ position (10:20 position, tips of the utensils at 10 o’clock and handles at 4 o’clock.  Leave the plates as they were presented, I know you want to stack them up or push them away but that is frowned upon in this context of fine dining. After the meal be sure to follow up with a thank you to the host after the meal and thank you cards within the next 24 hours, try to do it by hand if possible unless you have abysmal handwriting.And there you have it, now you know how to “eat like a pro”, for your reference I have a sample table placement of what your table could look like.

download


Until the next time I wish you the best of success. Stay tuned for next time when I cover more of the proper ways to navigate to big bad business world. Excelsior!

download (1)