Eggs in a basket

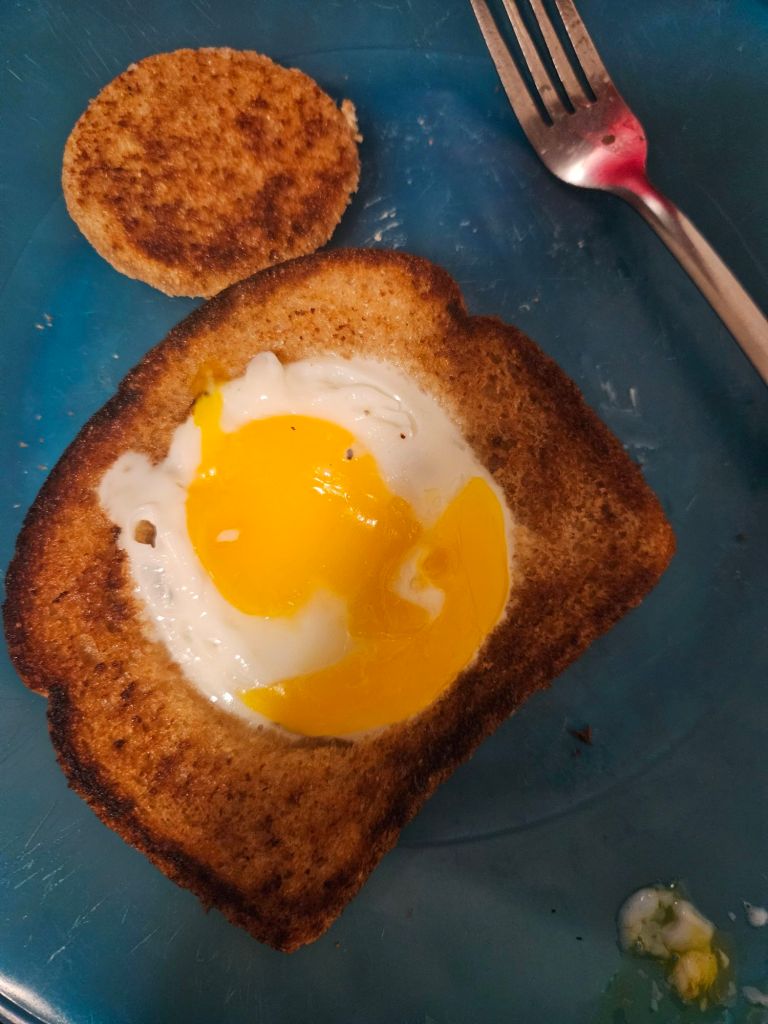
I have been saving this recipe post for a special occasion. Today will be the day I show you how to make eggs in a basket as it is November 5th (a day referenced in one of my favorite movies v for vendetta). This recipe will be super simple yet satisfying.

Ingredients You’ll Need:

1 slice of bread (any kind will do)

1 large egg

1 tablespoon butter (or cooking oil, if preferred)

Salt and pepper or amy desired seasoning to taste

Optionally you can add little bit of your favorite jam for a sweet yet buttery flavor

Lets get to business

Step 1: Prepare Your Bread
Place your slice of bread on a cutting board. Using a round cookie cutter or the rim of a glass, gently cut out a circle in the center about 2 inches wide. Set the round piece of bread aside; you can toast it along with the main slice later.

Step 2: Heat Your Pan
Place a small non stick skillet or frying pan over medium heat. Add the butter and let it melt completely, ensuring the pan is evenly coated.

Step 3: Toast One Side of the Bread
Lay your bread slice in the pan and toast it lightly for about a minute. This gives the bread a lovely crisp bottom.

Step 4: Add the Egg
Carefully crack your egg into the hole in the center of the bread. You will want the egg white to set so to get there you need to cook this low and slow. Ideally covering the pan with a lid to cook for about 3 1/2 minutes. You can go up to 5 1/2 minutes depending on how runny you like your yolk. You can also flip your bread and egg to aid in cooking the egg for more of a fried egg texture.

Step 5: Season and Serve
Sprinkle a pinch of salt and pepper over the top. Serve warm with the toasted bread circle on the side for dipping. This also goes well with jam for a sweet and savory contrast.

And there you have it folks! A simple yet satisfying breakfast that is full of flavor and comfort. Until the next time dear readers. Excelsior!

Might have browned it a bit longer but still worked out well!

Swamp potatoes with steak

Some days during the fall a nice hearty soup or stew has the capacity to warm the stomach and the soul. One recipe i had the privilege to try to scratch the stew itch were swanp potatoes. Swamp potatoes are essentially smothered potatoes cooked with onions, bell peppers, and seasonings until tender and rich in flavor. They’re often served alongside fried fish, grilled meats, or even as a meal on their own with some cornbread. For this particular varient i elected for extra protein with bone broth and steak.

Ingredients You’ll Need

4–5 medium russet or red potatoes, peeled and sliced into thin rounds

1 large onion, thinly sliced

1 lbs green beans

1 stick butter (unsalted)

1 medium bell pepper, chopped

2 cups chicken broth or water enough to cover potatoes halfway (i substituted for beef bone broth for extra protein)

2 cloves garlic, minced

1 oz onion soup mix

Assorted seasonings for flavor ( i used Cajun seasonings for the swamp potatoes and steak seasoning for my steak with some Mrs. Dash, pepper and a dash of cayenne for extra spice)

Optional: smoked sausage is commonly used but for this i deviated for pettite sirloin steak

Let’s get down to business:

1. Wash, peel, and slice your potatoes into thin rounds. This helps them cook evenly and absorb the flavors as they simmer. Cut your onions, pepper, and green beans and cut these down mince your garlic.

2. Build your flavor base with the broth, seasonings, and onion mix

3. Add the sliced vegetables and and butter and place on high for 4 hours or low for 6 hours and simmer until tender.

4. During the last 20 to 30 minutes of cooking proceed to season and cook your steak to desired temperature (i prefer medium to medium well). Slice the steak into cubes or strips and stir into the potatoes.

5. Serve and enjoy with your favorite sides or as a main dish.

And there you have it! A flavorful and comforting hearty southern fall meal.  This was enjoyable as it’s own dish. I wouldn’t have had room for a side if i tried. Until the next time dear readers. Excelsior!

Picadillo (Giniling) – Ground Beef in Tomato Sauce


I enjoy trying different kinds of foods from all over when I travel, and I try to also find recipes for places I might want to go as well. I make it a point to explore different kinds of cuisine from all places. One dish that i recently stumbled upon is Picadillo.  Picadillo, known in the Philippines as Giniling, is a hearty, comforting dish that brings together simple ingredients in a rich tomato-based sauce. What makes Giniling special is how adaptable it is. You can swap ground beef for pork, chicken, or even turkey. You can also swap the veggies for assorted heartiness and color.

For this recipe, you will need the following:

1 lb  ground beef (the leaner, the better, but I found a little fat in this recipe worked well)

3 medium potatoes, diced

2  large carrots, diced

1 medium onion, chopped

3 cloves garlic, minced

1 can tomato sauce (Alternatively I used fresh tomatoes that were blanched and chopped in the food processor)

2 tbsp soy sauce (I found teriyaki sauce works in a pinch)

2 tbsp cooking oil

Assorted spices of your choice to taste


Now let’s get down to the good part:

1. Prepare the base: Heat oil in a large pan over medium heat. Sauté onion and garlic until fragrant and translucent.


2. Brown the meat: Add ground beef and cook until browned, breaking up clumps with a spatula. Drain excess fat if necessary.


3. Season: Stir in soy sauce, tomato sauce, (for additional texture you can opt for  tomato paste to mix with the sauce). Simmer for 2–3 minutes.


4. Add vegetables: Mix in potatoes and carrots. Cover and cook for about 10 minutes, stirring occasionally, until vegetables are tender.


5. Finish: Add any additional veggies you may want to use (commonly peas and peppers are used, but you can use what you want) and the seasonings. Simmer for another 5 minutes until everything is well combined. (Green onions garnish is optional)

The finished product

And there you have it. A simple hearty dish that the whole family can enjoy. This one was a lot of fun. Until the next time, dear readers. Excelsior!

Shepherds pie

5 simplest recipes are the best. This time, I tried my hand at a dish I tried a while back that absolutely blew my mind. I also added my own twist on this recipe to make it even more macro friendly with some liberties I took with a few substitutions and additions as I went along.

For this recipe variant I used the following: 3 large peeled and quartered potatoes, 1 stick of butter (salted /unsalted), 1 medium onion chopped, 1 to 2 cups mixed vegetables, 1/2 cup broccoli chopped, 1 1/2 pounds ground beef (i utilized 93% lean 7% fat in this instance), 1 teaspoon of Worcester sauce (Alternatively A1 steak sauce works surprisingly well as a substitute), 1/2 cup of beef broth (alternately i used beef bone broth) , and any seasonings of your choice.

First peel the potatoes and place them into a pot to boil until fork tender for about 20 minutes

While the potatoes cook sautee all the vegetables together until tender in a skillet over medium heat.

For the next step, cook the ground beef and proceed to drain any fat and add to the vegetables and simmer with the seasonings, broth, and worcester sauce for 10 minutes covered up.

Once the potatoes are done, cut up the potatoes and add the butter and sprinkle with garlic powder (optional) and mash until it is all the way mashed up.

After mashing the potatoes, put the meat into an oven safe container and spread the potatoes over the tip and spread it out, and score with a fork if desired.

After scoring the potatoes place in a preheated oven at 400 degrees for 30 minutes until browned.

Once out of the oven feel free ro garnish with an optional green onion garnish and serve and enjoy.

This dish was so good I made it twice in the same two weeks. It makes for an excellent prepped meal through the week and a great comfort meal. The addition of bone broth and the broccoli in this version adds some extra macros to the mix. Until the next time dear readers, excelsior!

Mini basque cheesecake with homemade strawberry topping

During the holiday season, it is sometimes a challenge to stick to a diet when there is so much good food to have. Cheat days are nice, but then I had a thought of what can be done to still make a dish that is enjoyable year round without too much guilt. That’s when I decided to revisit the cheesecakes I’ve made in the past, but this time with less sugar. The basque cheesecake photos i have seen online inspired me to make my own sugar-free varient.

For this recipe you will need the following: cheesecake: 1 block Philadelphia light cream cheese, 1 1/2  cups plain Greek yogurt, 5 1/2 table spoons zero calorie sweetener of your choice, 2 eggs, 1 teaspoon of cornstarch and 2 table spoons of vanilla extract all at room temperature. Strawberry spread: 1 pound of strawberries halved and hulled, 1/4 cup zero calorie sweetener, 3 tablespoons of corn starch, 2 tablespoons of water, and a healthy splash of lemon juice.

To start your cheesecake, you will need to preheat your oven to 480. While that’s warming up, start to mix the cream cheese until smooth. Once that happens, mix in your Greek yogurt, vanilla, cornstarch, and sugar and continue stirring. Once incorporated, add one egg and carefully mix into the batter at a time and mix until smooth. I’ve seen these prepared with mini ramekins, but I only had full size available to me as well as a stunning lack of parchment paper, so I had to improvise with lightly greased aluminum foil. Bake for 15 minutes on the top rack and let them chill in the fridge for 3 hours.

No parchment paper? No problem.

While the cheesecakes chill, let’s make our spread. Chop the strawberries into halves (or finer if desired) and set to the side. Add your cornstarch into a small cup and mix with the water to make a slurry to add to the strawberries. Get a small to medium sauce pan and mix in the strawberries, cornstarch slurry, lemon juice, and sweetener over medium heat. Stir and break down the strawberries with a wooden spoon or rubber spatula of your choice. Once mashed down, place the mix under a low simmer for 5 minutes, stirring constantly and remove from the heat as the spread will thicken up as it cools. I stored mine in a mason jar for safe keeping and chill in the fridge with the cheesecake.

Guilt free goodness right there

Once 3 hours have passed with the cheesecake in the fridge, remove them from the foil and onto a place and give it a generous spread of the strawberries.

A little messy getting out the foil

This was an excellent  and guilt free dessert, and with the Greek yogurt, it had a nice little dose of protein hidden in there. The spread can last for a week, and the cheesecakes can last 3 to 4 days. This is a healthy and delicious dessert that you and loved ones can enjoy anytime! Until the next time, dear readers, excelsior!

3 ingredient low calorie  bread

I’ve been bitten by the cooking from scratch bug in recent weeks. There have seen many recipes i have had a want to create over the years and have tried recipes from various regions of the country and a few overseas.  I have decided to take on a challenge in the kitchen of which I’ve never undertaken: making bread. This was a beginner friendly bread that I created using a few simple ingredients: bread flour, rapid rise yeast, and pink hymilayan sea salt.

To start, you will want to heat 1 and a half cups of water on the stove. Next, you will need 3 and a half cups of bread flower to go into a large bowl. Once this has been placed in the bowl, you will need to add a table spoon of rapid rise yeast and half of a tablespoon of pink Himalayan sea salt

Dry ingredients ready to rock and roll

Once the dry ingredients are done the water should be nice and hot. Pour the water into the bowl and mix around until the flour is fully incorporated into the mix and form it into a ball.

I’m having a great time.  A ball if you will

Once this is shaped into a ball, cover it and place it somewhere warm and let it sit for an hour to build up in size. Once that is done put it into a bread pan that has been sprayed with cooking spray and form it into the pan and let it sit for another hour.

Two hours later

Once the hour has passed, put your oven on 450. Once the oven is heated bake the bread for 20 minutes to completion and remove to cool.

Bonus tip: I forgot that scoring the bread helps the bread expand more.

Once the bread has cooled, you will have a nice loaf of low calorie bread. I let a piece of this sit, but this bread lasted me about 5 days before it started to turn. I would recommend eating this right away while it is fresh.

Even without scoring the first time the bread looked great.

This was a wonderful first take on making a new dish. I realized this was rather small but I am looking to make it into larger loafs for the next time. This makes a very good peanut butter sandwich and with no preservatives, it was the most  guilt free pb&j that I have had in a while. Until the next time, dear readers, excelsior!

Easy Peach Cobbler Cinnamon Rolls

It’s been a while since I last shared a dessert recipe. In recent months, I’ve been coming up with various dishes, but a sweet treat is a must with the summer coming up. This is a quick and easy recipe for a tasty dessert combining two of my favorite desserts: peach cobbler and cinnamon rolls.

To make this you will need the following ingredients: 1 package of your favorite 8 count cinnamon rolls, 1 can of peaches ( sliced or whole or fresh to make 15 Oz worth), 1/4 cup heavy cream, 5 tablespoons of butter, 1/2 cup flower, 1/4 cup brown sugar.

First you will need to preheat your oven to 350 degrees F. While the oven is heating measure out 1/4 cup of peach juice and cut up the canned peaches (Alternatively just cut the peaches if they’re fresh) if not already sliced.  Mix this juice with your heavy cream and place the mixture into a greased baking pan.

Secondly, place the cinnamon rolls into the pan with the mixture and top with the sliced peaches. Once this is done, place the butter, brown sugar, and flower into a bowl and mix until combined and crumbly. Once the topping is ready, place atop the rolls evenly.

Thirdly, once assembled, place the cinnamon rolls into the oven for 45 minutes. Once out of the oven, pour the icing that came with the cinnamon rolls and enjoy!

A little messy but not bad for a first time

And there you have it in about an hours time you have tasty cinnamon rolls you can enjoy any time. This was a fun and simple recipe to make, and I highly recommend it if you’re a fan of unique cinnamon rolls. Or just love a good sweet treat once in a while! This recipe makes eight tasty cinnamon rolls perfect for sharing… or not. I hope this summer starts for you well, dear readers. Until the next time, excelsior!